Map / Diagram [ Content Tag Results ]
Photographs of maps and diagrams illustrating areas of operations etc.
Tag references
Divided into content type :
We have no History pages currently referencing this content tag at present...
1. [ account ]
Major Grant Diary (Scans)
9th - 12th June 1940
The Highlanders Museum and Queen's Own Highlanders Collection have very generously provided a scan of the diary compiled by Major Grant while a prisoner of war. The pages of this diary reproduced here cover the period 9 to 12 June 1940.

2. [ general ]
492 Field Battery Positions
11 Aug '42 to 24 Jun '45
Sketch map showing movements of 492 (Highland) Field Battery, R.A., throughout North Africa Campaign from August 1942 and on through Europe to June 1945.

1. [ photo ]
MacPherson Sketch River Somme
Nov - Dec 1915
Sketch map by Pte. MacPherson, 9th Royal Scots, illustrating positions around River Somme around Eclusier, Frise and Curlu Villages. November - December 1915. Sketch forms part of MacPherson's Diary.

2. [ photo ]
Pte. MacPherson Sketch "The Labyrinth"
June - July 1916
Section of trench system "The Labyrinth" June - July 1916

3. [ photo ]
MacPherson Sketch "Happy Valley"
Somme, July 1916
Sketch map by Pte. MacPherson, 9th Royal Scots. Caption reads "Happy Valley", Somme, July 1916. Sketch illustrates trench positions between Mametz Wood and High Wood around Bazentin. Sketch forms part of MacPherson's diary of Active Service.

4. [ photo ]
MacPherson Sketch Ancre Valley
Nov - Dec 1916
Sketch map by Pte. MacPherson, 9th Royal Scots, showing Ancre Valley area between November - December 1916. Part of MacPherson's diary of Active Service.

5. [ photo ]
Beaumont Hamel Diagram
152 Brigade Attack, 13 November 1916
Map / Diagram showing the 152 Brigade Attack on Beaumont Hamel on 13 November 1916 during the Battle of Ancre.

6. [ photo ]
Op. Order 149 Map
Beaumont Hamel, 13th Nov 1916
This photograph shows the reference map of German trench positions and objectives described in Operation Orders No. 149 for the attack by 1/6th Battalion, Black Watch, on Beaumont Hamel, 13 November 1916. The original is held at the Black Watch Museum.

7. [ photo ]
Sketch Map Fampoux to Roeux
Fampoux to Roeux, April 1917
Sketch map made by Pte. MacPherson, 9th Royal Scots, illustrating German and Allied positions around Fampoux and Roeux Villages along the River Scarpe during late April 1917. Sketch comes from MacPherson's diary of his Active Service.

8. [ photo ]
3rd Ypres Attack Plan
June 1917
A sketch map showing positions and attack plan at 3rd Ypres

9. [ photo ]
3rd Ypres Attack Plan Colours
June 1917
A copy of the sketch map showing positions and attack plan for 3rd Ypres, June 1917. Colour overlay has been applied to help illustrate the objectives.

10. [ photo ]
6th Seaforth Advance 3rd Ypres
31 July 1917
Map showing 6th Seaforth Advance at third Battle of Ypres from "The Spirit of the Troops is Excellent" By Derek Bird

11. [ photo ]
Poelcappelle Map
20 Sep 1917
Sketch map of positions at Poelcappelle, 20th September 1917.

12. [ photo ]
Cambrai Map, Bird
6th Seaforth Advance, 20th Nov 1917
Map detailing advance on 6th Seaforth in Battle of Cambrai, 20th November 1917.

13. [ photo ]
Cambrai Map, Gordons
20/21 November 1917
Sketch map of the Gordon Highlanders' advance in Battle of Cambrai, 20th/21st November 1917.

14. [ photo ]
1918 The German Offensive Map
21 - 26 March
Sketch map showing positions during the German Offensive, 21-26 March 1918.

15. [ photo ]
Map 6 Seaforth Bois de Courton
20 - 28 July 1918
Sketch map of 6th Seaforth Highlanders at the Bois de Courton in Champagne, 20-28 July 1918

16. [ photo ]
Map Counter-Attack Champagne
27/28th July 1918
Sketch map showing the advance during the counter-attack in Champagne over 27th and 28th July 1918.

17. [ photo ]
Map Gordons at Greenland Hill
Late August 1918
An illustrated map showing area of operations of the Gordon Highlanders in late August 1918 during the Second Battles of Arras.
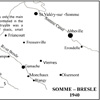
18. [ photo ]
Map of Somme-Bresle, 1940
1940
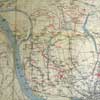
Sketch map of the Somme - Bresle in Northern France, 1940.
20. [ photo ]
Map of divisional deployment around St. Valery
June 1940
Sketch map of Divisional deployment around St. Valery. Based on a sketch by Second Lieutenant "Ran" Ogilvie of Gordon Highlanders.

21. [ photo ]
Somme area June 1st-6th 1940
from the Journal of Captain Taylor, Intelligence Officer 1 Gordons
Sketch map by Capt. Taylor, Intelligence Office 1 Gordons, detailing the Somme area June 1st-6th 1940

22. [ photo ]
Bn dispositions June 2nd 1940
from the Journal of Captain Taylor, Intelligence Officer 1 Gordons
Sketch map by Capt. Taylor, Intelligence Office 1 Gordons, detailing Battalion dispositions June 2nd 1940

23. [ photo ]
1 Gordons Somme Campaign
from the Journal of Captain Taylor, Intelligence Officer 1 Gordons
Sketch map by Capt. Taylor, Intelligence Office 1 Gordons, showing the area of the Somme Campaign June 1940

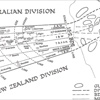
24. [ photo ]
1 Gordons The Grand Bois
from the Journal of Captain Taylor, Intelligence Officer 1 Gordons
Sketch map by Capt. Taylor, Intelligence Office 1 Gordons, detailing Coy and Pl. localities on completion of phase i (the capture and consolidation of the Grand Bois). June 4th 1940

25. [ photo ]
4th Camerons Attack at Huchenneville Sketch Map
4th June 1940
Sketch map showing the line of attack and positions of 4th Cameron Coys. during the attack at Huchenneville on 4th June 1940. A version of this original sketch is recreated within "Churchill's Sacrifice". This original sketch is in a manuscript account in an exercise book written in a prisoner of war camp. The book does not say who the author was but there is a loose letter in it to Major W A Macleay, 4th Battalion Q.O. Cameron Highlanders, commending a L/Cpl for his actions on the Somme on 4/5th June and it is assumed that Major Macleay was the author of the diary and map.

26. [ photo ]
Huchenneville Map D & B Coy.
1st Btn. Black Watch, 04 June 1940
A map showing the starting attack positions of "D" & "C" Coy. near Huchenneville on 4th June 1940

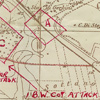
27. [ photo ]
Map of The Grand Bois
Area of 1st Gordon's Attack on 4th June 1940
This maps shows the area of attack on 4th June 1940 by 1st Gordon Highlanders on the Grand Bois from the west, supported by fire from 1st Black Watch in the Petit Bois (shown on the map as the Bois de Conchy)

28. [ photo ]
Sketch Map Huchenneville
4th June 1940
A sketch map showing the line of attack of "B" Coy. 4th Camerons during the attack at Huchenneville on 4th June 1940.

29. [ photo ]
1 Gordon Coy Areas, June 5th 1940
from the Journal of Captain Taylor, Intelligence Officer 1 Gordons
Sketch map by Capt. Taylor, Intelligence Office 1 Gordons, showing Coy areas at 1200 hrs and from 1300-2300 hrs on June 5th 1940

30. [ photo ]
Franleu sketch map
The sketch map is based on a recent visit by Brig. C. Grant and on the map in 'The History of the 7th Argylls - From El Alamein to Germany' by Ian C Cameron

31. [ photo ]
June 5th: 0500 to 0730 hrs
from the Journal of Captain Taylor, Intelligence Officer 1 Gordons
Sketch map by Capt. Taylor, Intelligence Office 1 Gordons, showing withdrawal from Somme between 0500 hrs and 0730 hrs June 5th 1940

32. [ photo ]
The Bresle position
from the Journal of Captain Taylor, Intelligence Officer 1 Gordons
Sketch map by Capt. Taylor, Intelligence Office 1 Gordons, showing the Bresle position, June 7th and 8th 1940

33. [ photo ]
1 Gordons disositions June 9th 1940
from the Journal of Captain Taylor, Intelligence Officer 1 Gordons
Sketch map by Capt. Taylor, Intelligence Office 1 Gordons, showing the 1st Gordon Highlanders' dispositions between 1400-2130 hrs on June 9th 1940

34. [ photo ]
Major Grant Diary, Page 27
9th June 1940
Scan of Major Grant's diary relating to 9th June 1940, Dieppe / Arques Le Battaille

35. [ photo ]
Major Grant Map (No.10), Dieppe
Dieppe - Arques Le Battaille, 9th June 1940
Sketch map from Major Grant's diary relating to positions around Dieppe on 9th June 1940

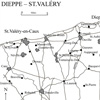
36. [ photo ]
Major Grant Map (No11), Dieppe to St Valery
Dieppe to St Valery, June 1940
Sketch map from Major Grant's diary showing the route from Dieppe to St. Valery.

37. [ photo ]
Withdrawal from the Foret d’Arques
from the Journal of Captain Taylor, Intelligence Officer 1 Gordons
Sketch map by Capt. Taylor, Intelligence Office 1 Gordons, showing the line of withdrawal from the Foret d’Arques June 9th - June 10th 1940

38. [ photo ]
Major Grant Diary, Page 28
9/10 June 1940
Scan of page 28 from Major Grant's diary relating to the 9th/10th June 1940

39. [ photo ]
Major Grant Diary, Page 29
10th June 1940
Scan of page 29 from Major Grant's diary relating to the 10th June 1940

40. [ photo ]
Route Veules Les Roses to Gueures
from the Journal of Captain Taylor, Intelligence Officer 1 Gordons
Sketch map by Capt. Taylor, Intelligence Office 1 Gordons, showing the route taken by the 1st Gordons from Veules Les Roses to Gueures on June 10th 1940

41. [ photo ]
1 Gordons St. Valery
from the Journal of Captain Taylor, Intelligence Officer 1 Gordons
Sketch map by Capt. Taylor, Intelligence Office 1 Gordons, of the St-Valery bridgehead western flank showing Coy areas on June 11th 1940 at 0930 hrs

42. [ photo ]
Major Grant Diary, Page 30
11th June 1940
Scan of page 30 from Major Grant's diary relating to the 11th June 1940 and movements around St. Valery

43. [ photo ]
Major Grant Diary, Page 31
11th June 1940
Scan of page 31 from Major Grant's diary relating to positions around Le Tot & St. Sylvan 11th June 1940

44. [ photo ]
Major Grant Map (No.13), St Valery
St Valery, 11th June 1940
Sketch map from Major Grant's diary relating to positions around St. Valery on 11th June 1940

45. [ photo ]
Major Grant Map (No.14), Le Tot
Le Tot & St. Sylvan, 11/12 June 1940
Sketch map from Major Grant's diary relating to positions around Le Tot & St. Sylvan and German Tank movements. 11th and 12th June 1940.

46. [ photo ]
St. Valery Tank Attack
from the Journal of Captain Taylor, Intelligence Officer 1 Gordons
Sketch map by Capt. Taylor, Intelligence Office 1 Gordons, showing the Tank attack at St. Valery, 1500-1520 hrs, June 11th 1940

47. [ photo ]
Sketch Map, Stalag XXb, Marienburg
A hand drawn sketch map (presumed to be by Henry Owens) showing the layout of Stalag XXb, Marienburg (some time between 1942 - 1944).

48. [ photo ]
492 Field Battery, Alamein to Messina
Sketch Map, Alamein to Messina
Hand drawn sketch map showing movements of 492 (H) Field Battery (128th Field Regiment) during the North Africa Campaign. Includes annotation detailing firing, not-firing and rest positions.
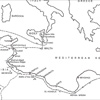
49. [ photo ]
Route of North Africa Operations
1942-1943
Diagram depicting the route of the North African campaign.
50. [ photo ]
Diagram El Alamein Operations
October 1942, North Africa
Diagram of the area of operations of 152 Brigade at El Alamein, North Africa, October 1942.

51. [ photo ]
Map of Op. Huskey, Sicily, 1943
Sicily, 1943
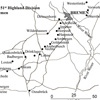
Map showing the route of the 51st Highland Division through Sicily from the landing at Portopalo to Messina during Operation Huskey, 1943.
52. [ photo ]
Map of Gerbini Attack
Sicily, 19th July 1943
Map showing the details of the Gerbini attack, belonged to Major W D Johnston, 243 Battery, 61st (Highland) Anti-Tank Regiment RA and is reproduced by kind permission of his son, Lieutenant Colonel (Ret'd) G S Johnston OBE, a trustee of the 51st Highland Division and Ross Bequest.
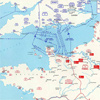
53. [ photo ]
Allied Invasion Force (Map)
6th June 1944
Map showing the Allied invasion force and German dispositions. Operation Overlord. Dated 6th June 1944
54. [ photo ]
492 Field Battery, V Day to VE Day
Sketch Map, V Day to VE Day
Hand drawn sketch map showing movements of 492 (Highland) Field Battery, Royal Artillery (128th Field Reg.) between "V" Day and "VE" Day. Includes annotation detailing firing, not-firing and rest positions.
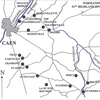
55. [ photo ]
Normandy and the Breakout
Area of Operations, June-July 1944
51st Highland Division's area of operations, France, June - July 1944
56. [ photo ]
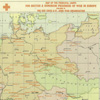
Map of POW camps in Europe
30th August 1944
Map of the principle camps for British and Dominion prisoners of war in Europe. The following corrections (dated 30.8.44) were attached to the original map:Stalag Luft IV in Tychow (G.3) now forms part of Stalag Luft III at Sagan (F.5). Stalag Luft VI, Stalag XXX D and Stalag 357 have been closed.
58. [ photo ]
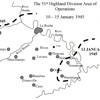
Area of Operations - Ardennes
10-15 January 1945
Map detailing the Highland Division's area of operations during 10-15 January 1945 in the Ardennes.
59. [ photo ]
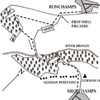
Map - Attack on Hubermont
12-13 January 1945
Map showing the details of the 5th Black watch attack on Hubermont. The attack took place the night of 12-13 January showing the initial (1) and final (2) company positions.
61. [ photo ]
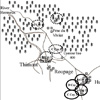
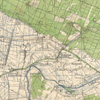
Maps - Hekkens
Feb, 1945
The providence of this map is not known and hence the pencil marks cannot be dated. However, the objective axis and start line are clear.
62. [ photo ]
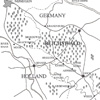
1st Gordons attack on Goch
18TH FEBRUARY 1945
This detailed sketch map accompanies the account from "So Few Got Through" by Martin Lindsay
63. [ photo ]
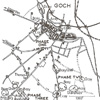
Map, Battle of Goch
February 1945
This detailed map taken directly from "The Spirit of Angus" illustrates the actions of the 5th Black Watch.

64. [ photo ]
Annotated Map of Op Plunder
Annotated map showing 51st Highland Division positions and objectives during Operation Plunder - the crossing of the Rhine. The map is dated 20th March 1945.

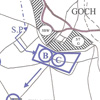
65. [ photo ]
21st Army Position - Op Plunder
Map showing the whole Allied Plan for the crossing of the Rhine. The circle shows Montgomery’s 21st Army Group.

66. [ photo ]
Brigadier Oliver’s map for the Rhine crossing
Brigadier Oliver’s map for the Rhine crossing by kind permission of the Black Watch Museum.

67. [ photo ]
Dempsey 2nd Army - Op Plunder
Map showing Lieutenant General Miles Dempsey’s 2nd British Army with 51st Highland Division crossing at Rees as part of Operation Plunder - The crossing of the Rhine, March 1945.
68. [ photo ]
Map of Operation Plunder
March 1945
Photograph of an original 51st Highland Division map for Operation Plunder
69. [ photo ]
Sketch Map of Groin, March 1945
March 1945
Sketch map showing key features of the attack on Groin
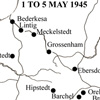
70. [ photo ]
Enschede to Bremen, Apr 1945
Apr 1945
Route taken by 51st Highland Division from Enschede to Bremen, April 1945