Battle of Cambrai
November 1917
This description of the 51st Highland Division's action at the battle of Cambrai is taken from "The Spirit of the Troops is Excellent" by Derek Bird being an account of the 6th (Morayshire) Battalion, Seaforth highlanders, in the Great War 1914-1919.
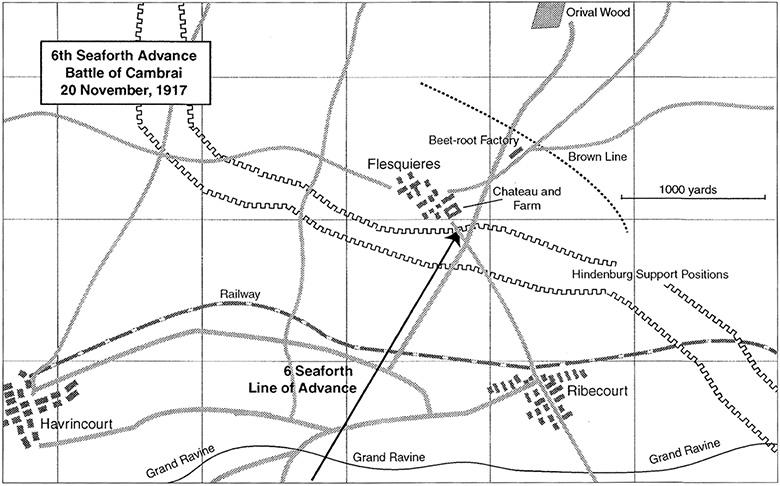
Cambrai Map, Bird
show infoDescription:
Map detailing advance on 6th Seaforth in Battle of Cambrai, 20th November 1917.
Credit:
Derek Bird
High Resolution Image:
Tags:
THE 6th SEAFORTHS AT CAMBRAI
On the 19th [Nov 1917] final preparations for the assault were made, items of equipment were issued and the men rested. At 2 a.m. on the 20th they were given a hot meal before moving off an hour later to the assembly positions. They were among the final parts in a huge operation that had been put into place over several weeks, almost all at night, and with an emphasis on ensuring that the Germans did not learn of the preparations.
The early hours of 20 November saw the Third Army, commanded by General Sir Julian Byng, in place and ready to carry out the surprise attack. From north to south, the 109th Brigade (part of the 36th (Ulster) Division), 62nd (2nd West Riding) Division, 51st (Highland) Division, 6th Division, 20th (Light) Division, 12th (Eastern) Division and the 29th Division, were ready on a front of about 10 miles to launch the attack. They faced a triple line of defences that were part of the formidable Hindenburg Line. The first was a maze of deep trenches and outposts, all protected by deep fields of barbed wire. The second, which was well connected to the first by communication trenches, was the double trench line of the support system, again heavily wired. The third was about 4,000 yards back and consisted of yet another double trench line. The divisional front for the attack started at 1,500 yards wide, grew to a maximum of nearly 3,500 yards at the third line, and narrowed down to about 2,200 yards on the final objectives. Within this area were the villages of Flesquières, Cantaing and Fontaine-Notre-Dame, the latter having the high ground of Bourlon Wood on its north-west flank.
Tank with Fascine
show infoDescription:
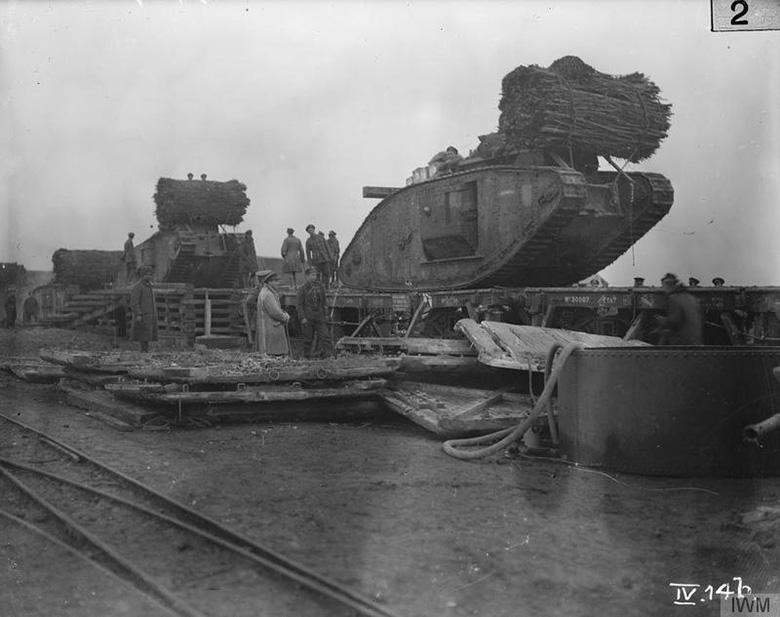
British Mark IV Female Tanks at Plateau Station, November 1917, aboard flat-bed railway carriages prior to transportation to forward area before the Battle of Cambrai. Each Tank is fitted with a 'Fascine', a large bundle of brushwood used to aid the crossing of open trenches.
Copyright:
IWM (Q 46932)
Tags:
The Highland Division planned for two brigades, the 152nd on the right and the 153rd on the left, to open the attack with two battalions from each advancing in the initial phase, before the other two battalions passed through them to maintain the impetus of the attack. This put, from right to left, the 1/5th Seaforth, 1/8th Argylls, 1/6th Black Watch and 1/5th Gordons in the first wave, and the 1/6th Gordons, 6th Seaforth, 1/7th Black Watch and 1/7th Gordons in the second. The four battalions of the 154th Brigade were held in reserve. Out of a total of 476 tanks available for the battle the Highland Division had 72 at its disposal. They were to be deployed in three waves, the first wave of 12 tanks to flatten the wire, the next 36 to deal with the first trench lines, and the final wave to continue the attack to the Flesquières Ridge and beyond. Each tank was equipped with a large fascine to aid crossing the trenches.
With the plan, guns, tanks, men and equipment in place there was little to do but wait. The battle opened at 6.20 a.m. on 20 November 1917 with a tremendous artillery barrage from more than 1,000 guns, many of which had been brought forward but had remained hidden and unfired until the moment of the attack. Scientific and technical improvements such as flash spotting, sound ranging, photo-reconnaissance and accurate surveying and map making allowed the identification of enemy gun positions and other points for consideration in the artillery fire plans. This, combined with accurate prior calibration of the guns, allowed them to 'shoot off the map' by comparing their own position with that of the enemy's before calculating the necessary bearing and range. By eliminating the need to fire ranging shots and then observing the fall of the shot to carry out adjustments, the gunners could now open an accurate barrage without any warning; the Germans were completely surprised by both the suddenness and intensity of the barrage. The first tanks and infantry moved off at 6.30 a.m. and were covered by a creeping artillery barrage fired by the smaller calibre guns as they headed towards the German lines.
As the 6th Seaforth were in the second wave and not due to move off until later they had time for a breakfast of porridge and bacon, washed down with a mug of tea, while waiting in their assembly trenches. Their advance started at 8.10 a.m. with 'A' Company led by Captain George Edwards on the left and 'C' Company led by Captain Robert Wellwood on the right. Each company formed into two waves with a ten-minute interval between them. The tanks of 'D' and 'E' Battalions of the Tank Corps were supporting them and they had done their job well by flattening sections of the German wire and making easy routes through the belts of wire. The front wave of the 6th Seaforth caught up with the tanks at the railway line that crossed the battlefield on its way to the village of Ribécourt on their right flank. There were seven tanks still in action at that point, and when the artillery barrage lifted off the Hindenburg Support Line they moved astride the trench and fired along its length, quickly subduing any enemy still fighting. This allowed 'A' Company to enter and capture the trench with only a handful of casualties. Unfortunately on 'C' Company's front no tanks were close by and the men had a difficult time getting into the trench but, with much gallantry and numerous casualties, they eventually managed to force their way in and then worked their way along the trench to establish contact with the 1/6th Gordons on their right. Captain Wellwood was wounded in the head, left hand and right leg early in the battle but made his own way to the CCS with the assistance of two German prisoners. In his absence Lieutenant George Flett assumed command of 'C' Company. Due to the heavy fire from Flesquières they were unable to complete their link up with the Gordons and so they constructed a bombing-block in the trench to hold the Germans at bay. The surviving tanks of 'E' Battalion had now moved on and as they reached the crest of the Flesquières Ridge German field guns opened fire at close range and knocked most of them out. Some of the tanks caught fire and there were many casualties amongst the crews, but some survivors clambered out and continued the fight alongside the infantry.
Knocked out Tank, Flesquieres Ridge
show infoDescription:
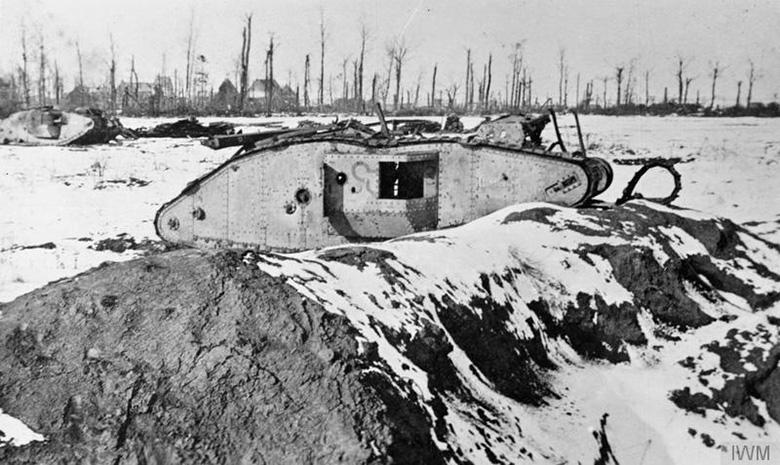
British Mark IV Tank 'Edinburgh II' of No.12 Section, 15 Company, 'E' Battalion, knocked out on Flesquieres Ridge during Battle of Cambrai
Copyright:
IWM (Q 56824)
Tags:
Campaign Reminiscences tells of a 'youthful officer' who, having had his tank knocked out, dismounted one of its Lewis guns, clambered onto the roof and, in full view of the Germans, proceeded to fire drum after drum of ammunition towards Flesquières, seemingly only stopping when his Lewis gun became too hot to hold. This officer, Second Lieutenant Wilfred Bion, was the commander of tank Edward II and in his own account he tells that he climbed onto the roof with four drums of ammunition and sheltered behind the fascine that was still attached to the roof of the tank. He then fired off the drums (a total of about 200 rounds) into the copse behind the wall that surrounded the chateau farm before running out of ammunition just as he spotted a German officer pointing him out to his troops. He therefore clambered down to join two of his crew who had positioned another of the tank's Lewis guns at the head of a communication trench and where they were also trying to bring into action an abandoned German machine-gun. As they were on their own out in front of the Highlanders, and were being fired on from almost every direction, they retired to the main trench about 100 yards away. Here Wilfred Bion reported to the senior infantry officer in the vicinity, Captain George Edwards of the 6th Seaforth. While talking to him he heard a loud crack and George Edwards slumped forward, his skull shattered by a sniper's bullet. Although Wilfred Bion was too stunned to appreciate what had happened, the experienced men around him quickly realised that it was not a random shot and that as they were well down in the trench it must have come from a point much higher than ground level. A quick visual search pinpointed a suspiciously thick part near the top of a tree and Lewis guns were directed at it. After a few moments a body tumbled out, crashed through the branches and hit the ground. As no other 'A' Company officers were left unwounded, a Seaforth NCO asked Second Lieutenant Bion if he would take command of the company. This he agreed to do providing the NCO stayed with him and advised him on his new duties because, having joined the tanks direct from training, he had no previous infantry experience to draw on. Shortly afterwards Bion was summoned back to his own HQ and left the Seaforths still fighting for Flesquières. The bravery and resourcefulness of this young officer was recognised in a report submitted by the division that included a recommendation for the award of the Victoria Cross. Wilfred Bion subsequently learnt that he was to be awarded the DSO and he received the honour from the King at Buckingham Palace in early 1918.
The 6th Seaforth had now lost the support of the tanks either through enemy action, breakdowns, or shortage of fuel, and had to rely on their own skill and bravery to force their way forward. Every attempt to advance to the Flesquières Trench was met by withering fire from machine-guns positioned in the village or along the base of the wall surrounding the nearby chateau and the chateau farm; the wall provided excellent protection and loopholes knocked through it allowed reasonable arcs of fire. One officer, Second Lieutenant Donald Grant, accompanied by his servant, got further forward than anyone else, the pair fighting their way along a communication trench. Donald Grant was reported to have personally bayoneted a number of Germans on the way but when they left the relative safety of the communication trench to advance further into enemy held territory they were both shot dead. The hold up cost the 6th Seaforth many casualties.
One, Second Lieutenant William Paterson, had written an account of his time in the army that, although unpublished, has survived along with a transcript of the letter to be sent to his parents in the event of his death. Written four days before the battle he said, in part:
"The fact is we are on the eve of a great battle or advance, and with my platoon, I have been detailed to go to the furthest objective 3,500 yards from our own trenches. I need not tell you what this means - you know well enough. Well, I hope this message never reaches you, because if it does not, then I come out of the fray all right. However, so many are bound to fall, and perhaps I amongst the rest. If such should happen, remember that the sacrifice has been made in a good cause."
Unfortunately the letter did have to be sent as William Paterson was killed during the fighting at Flesquières. Also among those killed were Second Lieutenants Alexander Mann and Frank Aitken.
As it was obvious that things were not going well Lieutenant-Colonel McDonald went forward to assess the situation. He was able to reorganize the two companies and prepare for a further advance, but extremely heavy machine-gun fire kept them pinned down. A little later some tanks came up on their left and, although they could not go forward due to a lack of fuel, they could still use their 6-pounder and Lewis guns to provide covering fire. Under this fire the 6th Seaforth pushed forward again and after severe fighting got into the Flesquières Trench, with their right on the Flesquières - Ribécourt Road, and their left about 300 yards away towards the comer of the village. From this trench they made two more attempts to attack the village under covering Lewis gun and rifle fire, but they were beaten back by the German machine-guns. Later in the afternoon more tanks arrived and six entered the village. The 6th Seaforth quickly prepared four platoons to try to get into the village, two attacking through the wood and two direct into the village. Unfortunately the tanks did not provide the hoped for support and this attempt, despite a barrage of Stokes mortars and rifle-grenades, also failed. The infantrymen did, however, manage to establish a number of posts around the edge of the village, but these then had to be abandoned when it became apparent that their left flank was unsupported and that they were being fired at from all directions, including from behind. Once all the men were back in Flesquières Trench the CO made his plans for securing the flanks and ensuring they were not caught unawares by the enemy as it was by then dark. In order to keep the Germans from knowing of their poor situation the 6th Seaforth kept up constant Lewis gun and rifle fire on the village to give the impression of strength. Lieutenant-Colonel McDonald tried to organise an attack for 10 p.m. in conjunction with the 1/7th Gordons, but that battalion's CO was not at his HQ and by the time he got the message he felt the night was far too dark for another attempt.
During the night the Germans withdrew from Flesquières enabling the 6th Seaforth, and the 1/6th and 1/7th Gordons, to advance at dawn and push through the village to the 'Brown Line' where they established strong positions to the north-east of the Village.
The failure of the Highland Division to capture Flesquières on the first day of the battle, when other objectives were taken, caused many commentators to criticise MajorGeneral Harper for the way in which he utilised his quota of tanks. It would appear that following limited experience of tanks at Arras and Ypres the division had concluded that they attracted much enemy fire and to minimise infantry casualties they should follow on at least 150 yards behind the tanks. This lack of close cooperation may have led to some of the difficulties, but it must also be borne in mind that the defenders of Flesquières were more resolute than their compatriots on other parts of the battlefield who surrendered in large numbers. The German artillery at Flesquières was also well placed to pick off the tanks as they crested the top of the ridge and the lack of infantry close by to engage them with rifle or machine-gun fire played into their hands.
With the advance now taken up by other battalions the 6th Seaforth were able to consolidate their new positions, reorganise and get some rest before being called on again. The previous 24 hours had been very eventful and the numerical tally of the fighting was in their favour, they had killed an estimated 50 Germans, taken 305 prisoners and had also captured 6 machine-guns, 5 field guns and many other pieces of equipment. Their own casualties were recorded in the War Diary as 6 officers killed and 3 wounded; 20 ORs killed, 43 wounded and 5 missing.
By the evening of the 21st the front line had advanced beyond Cantaing and the 1/7th Argylls and 1/4th Seaforth had secured the village of Fontaine-Notre-Dame. The 1/4th Seaforth then took over the defence of the newly won positions but on the morning of the 22nd a major German counter-attack from three sides pushed them out again, and until Bourlon Wood on the northern flank was secured it was unlikely that anyone could successfully hold the village. Therefore a combined attack on both the wood and the village would be required.

Men Shaving, Flesquieres, 23 Nov '17
show infoDescription:
Men of the 51st Highland Division taking the opportunity to shave at the well in the newly captured village of Flesquieres, 23 November 1917, during the Battle of Cambrai
Copyright:
IWM (Q 6324)
Tags:
For this attack the 6th Seaforth were brought forward from Flesquières in the early hours of the 23rd and in conjunction with the 1/6th Gordons on their right they were to advance on Fontaine-Notre-Dame at 10.30 a.m. To their left the assault on Bourlon Wood was to be carried out by the 17th and 19th Royal Welsh Fusiliers of 119th Brigade, 40th Division. This promised to be a very difficult attack, not least due to the fact that all units of the Highland Division had been involved in operations for three days and the men were very weary. At 10.10 a.m. the 12 tanks allotted to 152nd Brigade advanced, followed 20 minutes later by the infantry. Despite a very heavy German artillery barrage the men were able to get forward with few casualties and also managed to keep in touch with the adjacent battalions. However, by the time they were approaching the village, the 1/6th Gordons had begun to lag behind due to intense machine-gun fire from both the village and from La Folie Wood to the south.
The 6th Seaforth pushed on, keeping their left flank in touch with the Royal Welsh Fusiliers until about halfway along the eastern side of Bourlon Wood. Here they were brought to a halt by the enemy machine-gun fire from the village. The right hand platoons of the 6th Seaforth had a very hard battle trying to gain a foothold and, although they had the help of the tanks to overcome the Germans on the village outskirts, they were unable to penetrate further as 'every house seemed to have a machine-gun'. Throughout this battle the men of the 6th Seaforth were under enfilade fire from machine-guns on their right flank. They managed to hold their positions until the afternoon when reports came in of a German counter-attack through Bourlon Wood that caused their left flank to be withdrawn to a better position.
Once again, with the situation becoming difficult and confused, Lieutenant-Colonel McDonald went forward to assess the problem and find solutions. On arrival he found that his men had remained in touch with the Royal Welsh Fusiliers and that, although they had retired slightly, the line was far from broken. He organised the consolidation of a new line running from the south-east comer of Bourlon Wood, across the main Bapaume to Cambrai road, and on to a sunken lane south-west of Fontaine-Notre-Dame. The battalion remained in these positions until relieved in the early hours of the 24th by the Coldstream Guards. The fighting for Bourlon Wood and Fontaine-Notre-Dame cost the Morayshire battalion another 7 men killed, 93 wounded, and 24 missing. The War Diary estimated that they had killed about 30 Germans, taken 173 prisoners and had captured 4 machine-guns.
Their achievement is marked in Campaign Reminiscences by the following comment:
"The perfect order in which the men, who, by all the ordinary rules and regulations of war, ought to have been a spent force, marched forth, won for the Brigade considerable renown, and their feat of undaunted courage stands out clearly and distinctly amongst the many glorious achievements of the Cambrai offensive."
After being relieved the tired survivors of the battalion moved back to Flesquieres where a hot meal was served, before moving on to Ytres where they boarding a train that arrived at Aveluy in the early hours of the 25th.
Account of the Gordon Highlanders' advance during the Battle of Cambrai, 20/21 Nov 1917, from the "THE GORDON HIGHLANDERS in the FIRST WORLD WAR 1914-1919" by Cyril Falls