
152 BRIGADE’S ATTACK ON BEAUMONT-HAMEL
Extract from "The Spirit of the Troops is Excellent" by Derek Bird
An account of 152 Brigade's attack on Beaumont-Hamel on 13th November 1916.
[This account is taken from "The Spirit of the Troops is Excellent" by, and with the kind permission of the Author Derek Bird]

Flooding in Ancre Valley, Nov 1916
show infoDescription:
Flooding across the Ancre Valley area, November 1916
Copyright:
IWM Q1568
Tags:
"The Highland Division's plan was to have two brigades attacking, the 152nd on the left and the 153rd on the right. Each brigade would put two battalions in the lead, for the 152nd Brigade this was the 1/8th Argylls on the left and the 1/5th Seaforth on the right, each split into four waves. The 6th Seaforth were to follow on in two waves across the whole of the brigade front. It was intended that all the battalions would advance at the same time, but would maintain a distance of 50 paces between each wave. The 6th Seaforth decided that their first wave would consist of' 'A' and 'D' Companies and the second wave 'B' and 'C' Companies. Having reached the early objectives, parties from 'A' were detailed to secure the entrances to two caves, while the remainder of the battalion formed into a single wave for the next phase of the attack.
The battalion's part in the battle was laid down in Operation Order No. 26, dated 27 October 1916, which detailed many different aspects of the forthcoming battle. For example, under the heading 'Dress' were instructions that each man was to wear his greatcoat and carry four bombs in the pockets. The bombs were to be deposited during the advance at predetermined positions in the German line for use by the specialist bombing parties. Each man was also to carry two rolled up sandbags, and 50% of each wave would carry either a pick or hovel in the ratio of two picks to each shovel - all these being items essential for the consolidation of captured positions. Other instruction included the use of signal flares for notifying contact aircraft of the positions of the advance, position of water and ration dumps, synchronization of watches, carrying of maps and documents and the handling of prisoners of war. An annex to the orders gave the details of the artillery barrage supporting the division.
With all the detailed planning having been carried out some time before, all that remained was for the men, now formed up in their jumping off positions, to clamber out of the trenches and advance on the enemy. Their performance was, however, anything but a certainty as despite having been in France for eighteen months, and in the front line on many occasions, the 6th Seaforth had not yet been involved in a full-scale attack.
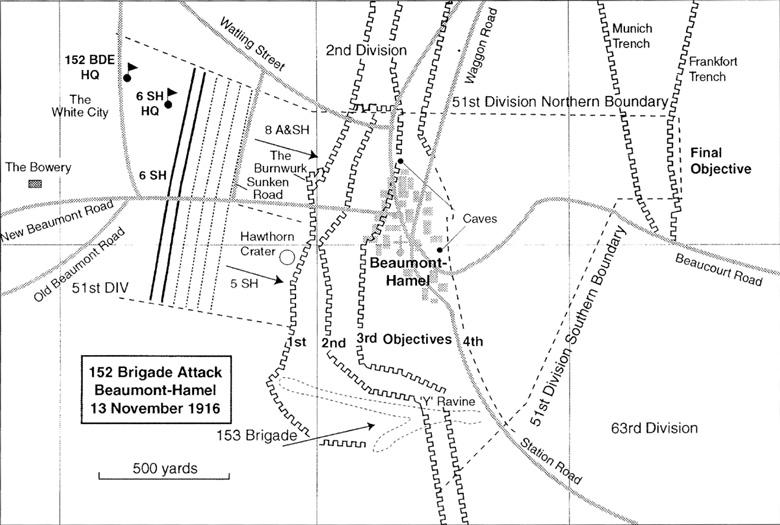
Beaumont Hamel Diagram
show infoDescription:
Map / Diagram showing the 152 Brigade Attack on Beaumont Hamel on 13 November 1916 during the Battle of Ancre.
High Resolution Image:
Tags:
At 5.45 a.m., just as the very first signs of dawn appeared, the Hawthorn mine was detonated, the artillery opened an intense barrage on the German positions and the infantry rose from the trenches and advanced across No Man's Land.
With the 6th Seaforth forming the fifth and sixth waves of the attack they first had to move forward over the positions previously occupied by the forward battalions. This they did without any trouble, although at one stage they overtook part of one of the leading battalions and had to pause briefly to allow them to regain their position before carrying on across No Man's Land. Most of the division's Vickers machine guns were grouped at a point known as The Bowery and were firing a protective barrage onto the German rear positions, however, the attacking battalions had to be carefully briefed that due to the contours of the ground it would sound as if the bullets were only just passing over their heads, although in reality there would be a distance of 'several feet'!
The advance was far from easy because of the legacy of the poor weather in the weeks before the battle and it was reported that in places the mud was still waist deep, indeed, one of the 6th Seaforth's runners got stuck in the mud and was unable to extricate himself; he was tuck for five hours before being found and pulled out. The History of the 51st (Highland) Division gives an illustration of the state of the ground: Let two teams dressed in battle order play football in the dark on a ploughed field in a clay soil after three weeks' rain, and some of the difficulties of the attacking troops might in some measure be appreciated.
The advancing battalions were initially able to take advantage of the pre-dawn darkness and the thick mist that obscured their movements from the Germans, although it did make it difficult to keep direction. Once the waves of 1/5th Seaforth and 1/8th Argylls had captured the German front line the 6th Seaforth passed through them and pressed on to the second line. Here strong resistance was encountered and the men became scattered. Lieutenant James Bliss was able to assemble a party of men from 'C' and 'D' Companies, a well as some from the 1/5th Seaforth, to continue the advance toward Beaumont Hamel, and they reached the outskirts of the village before being driven back to the German second line trench by enemy machine-gun fire. Here they found that it was still not fully cleared and a number of dug-outs still contained German troops. The party therefore had to contend with clearing the dug-outs and getting prisoners to the rear, as well as working hard to consolidate the position. They continued their work into the afternoon before joining up with the rest of the 1/5th Seaforth to clear the village.
In the northern sector of the division's front were two large caves, and 'A' Company was detailed to provide parties to capture them. Closely following the barrage the party led by Second Lieutenant McVicar captured the northern cave, and that led by Second Lieutenant George Edwards captured the southern one. Edwards arrived at the entrance having passed through part of the British artillery barrage and with the support of just a few men, some of them already wounded. Calling on the occupants to surrender the Germans agreed, not realising how few Highlanders there were outside, and the gallant little band took charge of a large group of prisoners; some reports say as many as 400. Some minutes later a German bombing party appeared at the at the cave mouth, put most of the Seaforth party out of action, and forced George Edward to surrender to his former prisoners. He was taken to a nearby dug-out which was in fact a battalion headquarters, where he was questioned by a German battalion commander and his staff. After a short time the sounds of rifle fire and bomb indicated that the situation outside had changed again. Edwards then suggested to the German that as they were probably now surrounded it would be prudent for them to surrender which, after a brief discussion they did. Second Lieutenant Edwards therefore took charge of his high-ranking prisoners and marched them back to the 6th Seaforth HQ where he handed them over to Lieutenant-Colonel Graham. For his bravery, and indeed audacity, Second Lieutenant Edwards was awarded the DSO.
The rearmost company continued to press forward, but having lost its officers early in the attack the NCOs had to take charge and organised the later stages of the attack. This they did, along with the subsequent consolidation of the newly captured positions, in conjunction with men from 'A' Company and the 1/8th Argylls. Although the mist and the smoke aided their advance by spoiling the German's view of the attackers, it also led to many problems for the Highlanders. Men became disorientated in the wasteland of craters and mud, with platoons and sections being split up in the confusion, but they won through by joining up with anyone they happened to find themselves alongside and continued to press on. Despite a very hard day's fighting there was to be no immediate respite, but at least their efforts in consolidating the newly won position paid dividends when they were successful in beating off German counter-attacks through the evening and night.
The list of 'booty' captured at Beaumont-Hamel is interesting and included machine-guns, minenwerfers, 32,000 rounds of small arms ammunition, bombs, flares, searchlights and a complete armourers workshop. Of a less military nature were stocks of tinned beef from Montevideo, Norwegian sardines, cigars, cigarettes (including British Wills' Gold Flake), coffee beans and all of the Germans' incoming mail. Most intriguingly the Highlanders also found a piano, dancing slippers, women's clothing including silk stockings and petticoats, and a cat o'nine tails. Also some bottled beer and large quantities of bottled seltzer water were found and, as the men needed to quench their thirst after a hard day' fighting, they were only too happy to drink it. Lieutenant Andrew Bain of the 1/7th Argylls said many years later in an interview for the Imperial War Museum that because of the laxative properties of the seltzer water it had a 'very moving result' on his men!
The battalion stayed in the newly captured position until relieved on the 14th when they were able to make their way to dug-outs in positions known as Lanwick Trench, King Street and White City. Despite now being out of the fighting they got little rest due to the urgent need to provide men to carry bombs forward to the battalions holding the front line. They were eventually relieved on the 15th and wearily made their way back to the camp at Mailly-Maillet, where hot baths were provided and they were made as comfortable as possible.
The 51st Division had, with the aid of the division on their flanks, performed magnificently. They had overcome both the incredibly strong German defences of Beaumont Hamel and the very difficult ground conditions. The success at Beaumont Hamel came at a cost in men's lives and when the roll call was taken 14 officers and 263 ORs were absent. During the three days spent in the line the battalion had lost 5 officers and 75 ORs killed, and more succumbed to their wounds in the following days. The Highland Division as a whole suffered more than 2,000 casualties, about 500 of whom were killed or died of wounds, but the battle was still hailed as a great success and was later recognised as the 'foundation stone on which the reputation of the Highland Division was built'.
The Hawthorn mine had originally been blown at 7.20 a.m. on I July 1916, some ten minutes before the infantry advance began. These vital minutes allowed the Germans to occupy the lip of the crater and fight off the British infantry. The German had since fortified the crater considerably and so a new tunnel was dug and charges were laid ready for the November attack. The crater is still there among the trees that have grown in the intervening years, a short walk up a path from Auchonvillers to Beaumont-Hamel road.
George Eric Edwards was born in Lossiemouth on 23 Feb 1889 and was a draper by trade. He joined the 6th Seaforth as a private in September 1914 and was commissioned in the field in March 1916. In 1917 he was also to be Mentioned in Despatches for his part in the Battle of Arras, and was killed during the Battle of Cambrai. The Moray Golf Club at Lossiemouth later commemorated George, and his cousin Sgt Alexander Edward, VC both of whom had caddied at the club as youths, by placing a memorial sun dial placed alongside the home green.
In the foreword to The Morayshire Roll of Honour Lt-Col Graham is recorded as saying at a post war meeting of the Moray and Banffshire Society in Glasgow that: 'But for the bravery of Lieutenant G.E. Edwards, Lossiemouth, the 51st Division would probably have failed in November 1916 to take Beaumont Hamel. In the whole of the record of the late war, where acts of great bravery were so common, he did not believe there was a braver action than of the late Lieutenant Edwards. He had been recommended for the Victoria Cross, but for some reason unknown to him the lesser honour of the DSO was all that was conferred, an honour which he regretted to say that brave officer did not live to enjoy'.
The Germans had established a seltzer water factory a few miles away at Bapaume.
The bodies of 51 men or the 6th Seaforth were recovered and buried in Mailly Wood Cemetery. Others were buried in other nearby cemeteries such as Beaumont Hamel British Cemetery, Ancre British Cemetery, Auchonvillers Military Cemetery, Cayeux Military Cemetery, and Hawthorn Ridge Cemetery No I. The 14 men who have no known graves are commemorated on the Thiepval Memorial to the Missing. The graves of many of those who died of wounds can be found scattered down the lines of medical evacuation in places such as Varennes, near the CCS, and the General Hospitals at Etaples and Rouen near the coast."
Division History References :
A description of the battle of Ancre in November 1916 which, for the 51st Highland Division, will be remembered as the Battle of Beaumont Hamel.